It is highly likely that during the use of the Manage Permissions screen you find that you are setting the same permissions for multiple users under the same customer account.
An easy way to apply a set of common permissions to multiple user accounts is to make use of 'Profiles'.
On the Manage Permissions screen you will see there is an ![]() checkbox which when checked enables the 'Select Profile' drop down field and the
checkbox which when checked enables the 'Select Profile' drop down field and the ![]() button. You can then select from the Select Profile drop down field a profile name, if any are created, and then click on the
button. You can then select from the Select Profile drop down field a profile name, if any are created, and then click on the ![]() button to apply that profile to the selected user.
button to apply that profile to the selected user.
To create your own profile follow these steps:
| 1. | Select the customer and user name from the drop down fields that you wish to create a new profile with. |
| 2. | This will then display the permission list, checking the boxes for those that the user has had applied to their account already. |
| 3. | Proceed by checking\un-checking the relevant permissions that will be contained with the profile you want to create |
| 4. | Once you are happy with your selections, click on the |
| 5. | This will reveal some additional fields below the button which will need completing before the profile is created |
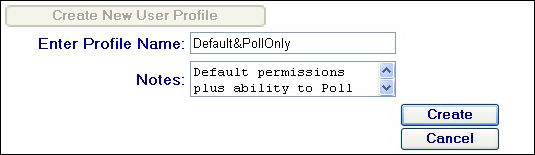
Profile Name and Notes Fields
| 6. | Enter in a relevant profile name and notes describing the profile |
| 7. | Click on the |
| 8. | A confirmation message will then appear at the top of the screen as follows: |
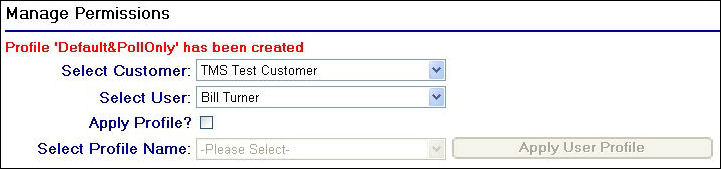
Confirmation of Profile Creation
| 9. | Now that you have created the profile you will need to apply it to the user |
| 10. | Ensuring that the user is still selected from the drop down, check the |
| 11. | From the Select Profile Name drop down field, select the profile name you have created |
| 12. | Click on the |
| 13. | A new confirmation message will now appear at the top of the screen as follows: |
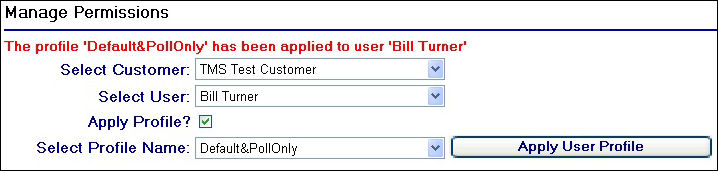
Confirmation after applying a Profile to a User
You can then apply the profile to any other users by selecting the user from the drop down and following steps 10 to 13 above.